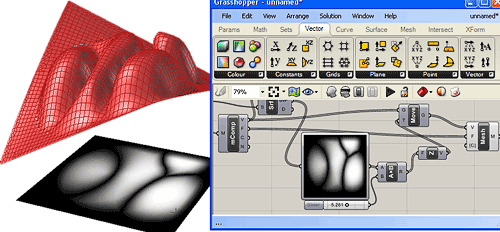
Displacing a mesh with an image in GH
Here is a workflow I’ve developed for mapping images to meshes and other geometry. It’s useful for setting up raster based geometry manipulations, or for mapping image-based datasets to topography, for example. I’ll explain in detail the technique for displacing a mesh with a greyscale raster image, and then at the end suggest ways to expand the technique to other applications.
Step 1: Model your mesh in rhino, and create a greyscale image in photoshop (or some other image software) to serve as the displacement map. Let black pixels represent no displacement, and white pixels represent maximum displacement.

Step 2: In Rhino, use the “PictureFrame” command to place your texture map image. Place it in the top view, and align it to your mesh at the desired scale and orientation.

Step 3: Now the grasshopper begins. Load your mesh into grasshopper, and load the PictureFrame as a surface. Use a “decompose mesh” component to extract the vertices of the mesh.

Step 4: For every mesh vertex, we want to find the UV coordinates of its projection to the PictureFrame surface. The quickest way to do this is to use the Surface Closest Point component; the only caveat with this is that if the displacement map is smaller than the xy extents of the mesh, you will get the edge condition repeated everywhere the mesh vertices would “fall off” the surface in a perfect z-axis projection. Since the boundary of this example displacement map is completely black, representing 0 displacement, this will not be a huge problem. Once we have the UV coordinates from the Srf CP component, we can plug them into an image mapper with our displacement map file loaded into it.

Step 5: Right-click the image mapper and set its filter to “Value (Brightness).” This causes its output to produce single numerical values in the range from 0-1, instead of RGB color data. Once we have these values, we can multiply them by a factor (determined by a slider) and connect them to a unit Z vector. We can use these new vectors to move the vertices of the original mesh.

Step 6. Finally, we can reconstruct the mesh with a Mesh component that accepts the moved vertices as its vertex input and the faces from the original mesh. You can play with the magnitude of the multiplication factor, and also with the density of your original mesh if the displacement result isn’t finely enough grained.

I use this technique for mesh displacement as discussed above, but it can also be applied to a number of other situations. Once you have properly loaded an image into grasshopper and aligned it by using the PictureFrame + Srf CP trick described above, you can use the resultant data for any number of things. I have used it for example to overlay the bitmap output of an ecotect analysis and pull numerical data from it at specific points.
Hope this tutorial is reasonably clear – feel free to post questions and further examples in the comments!
Filed under: Grasshopper | 1 Comment
Tags: bump map, displacement, ecotect, mesh

hi, i would like to know how you set the image tile and interval!
thanks in advance